Thank you for stepping into the Leadership God designed for you! Leading an online LifeGroup is an incredible way to connect people when an in-person group may not be possible. You can encourage each other, share scripture, pray for one another and help each other take those invaluable next steps in our walk with Christ. All the same things you can do in person, but done over the internet.
When doing anything for the first time, expect some adjusting as everyone becomes familiar with the new approach. Real relationships require effort and Online LifeGroups are no different.
So hang in there if your first few meetings present unique challenges. As a Leader, you are the Chief Problem Solver, you’ve got this!
As you prepare for your LifeGroup’s first online meet-up, please use the information on this page as a guide to available technology, keys to quality online interactions and other general information. Also, we’re here to help, so if you have any questions, don’t hesitate to reach out to your Campus LifeGroup Pastor.
Technology
- Pros: Free. Unlimited time. Closed Captioning. Accessible via web browser on computer.
- Cons: Requires a google account for all participants. (can sign up for one HERE). Phone-in option not available unless you have a business account. (If you have a G Suite business account, you can also share a phone number for people to call into the meeting if they don’t have access to a computer or smartphone. GSuite accounts are free till July 1.)
- Capacity (25 Participants/Devices)
- How to Use:
- Open Google Hangouts in your web browser or mobile app (apple device, android device, chrome web browser extension)
- Login
- Click “Video Call” button
- Click “Invite People” and type in their email address (If they don’t have a google account it will send them an invite to setup an account)
- You can also schedule a meeting on your google calendar and send an invite to join you at a specific time, including a link to your online meeting. (See Instructions)
- Watch 6 minute youtube tutorial.
- Pros: Free. Only hosts are required to have a Zoom account. There is a phone-in option.
- Cons: Limited to 40 minutes unless you have a paid account ($14.99/mo). Have to download Zoom application to phone or computer.
- Capacity (100 participants/Devices)
- How To Use:
- Open Zoom in a web browser or mobile app (apple device, android device, chrome web browser extension)
- Login
- Click “Host a meeting with video on”
- Click “Invite participations”
- Select how you’d like to send an invite:
- Default Email, Gmail, Yahoo to send email invite
- “Copy URL” or “Copy Invitation” to copy a link and send it via a text message, email, facebook message, etc.
- You can also schedule a meeting on the zoom website and send an invite to join you at a specific time, including a link to your online meeting. (See Instructions)
- Watch tutorial videos in Zoom video library.
- Pros: Free. Accessible via web browser on computer. Can access without a Facebook account. (If you don’t have a Facebook account you’ll need to download the app to your phone and use your phone number.)
- Cons: Phone-in option not available.
- Capacity (50 participants/Devices: 6 video, 44 audio)
- How To Use:
- Open Facebook Messenger on your web browser or mobile app
- Login (with facebook account or phone number)
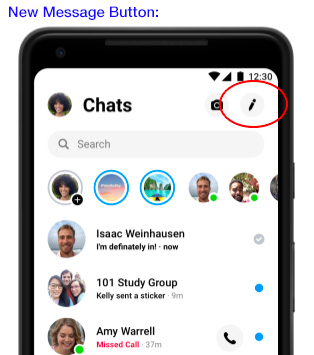
- Click “New Message” button to add facebook friends to group chat (see image below)
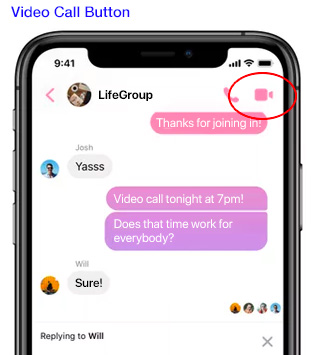
- After adding contacts, click the “Video Call” button to start video chat. (see image below)
- Watch 2 minute tutorial.
- If your group is not as tech savvy or doesn’t have the technology to do a video chat, this website offers a free conference call option to phone in. It will most likely be a long distance number.
- How to use:
- Sign up for an account HERE
- Share the dial-in number and access code with your group.
Best Practices/Online Etiquette
- Request your LifeGroup members download meeting software prior to meeting.
- Make sure your face has sufficient lighting.
- Lighting works best in front of your face, not behind.
- Make sure your face is centered in the video camera.
- People won’t want to see your forehead, or neck, or miss you all together.
- Position the camera to eye level or slightly above.
- Select the quietest room/location you can find.
- Turn off anything making noise in the background (TV, radio, appliances).
- Put pets in a different room or have them in a place where they will be most quiet.
- Places like a coffee shop or restaurant can work but sometimes background noise can be an issue. Noise canceling headphones can help with this. But beware external noises that will come through your microphone.
- Only use one device per household.
- When two devices are used in one location it produces feedback (really annoying hi-pitched noises).
- Mute your computer unless you’re talking.
- If everyone’s microphone is turned on at the same time, the sound quality can be an issue and it can be hard to hear the person who is talking. The best policy is to mute yourself when you are not talking.
- If you are muted, make sure to nod your head and listen well so people can recognize you are following them.
- You will be muting and unmuting A LOT, so get used to it.
- Also, people will point it out if you stay muted when talking, so don’t be offended.
- Or maybe, the moderator will mute you, so don’t take that personally.
- Be an assertive LifeGroup Leader.
- The LifeGroup Leader will jump on a few minutes early to welcome everyone.
- Redirect the conversation or mute participants as necessary. This may feel rude but is necessary to manage a good online experience.
- Remember the 70/30/30 Rule. The group members should talk 70% of the time, the LifeGroup Leader should talk 30% of time and should count to 30 in their head before breaking a silence.
- Create a plan for participants to indicate they’d like to talk.
- You may try something like raising a hand, answering in a specific order, or another signal.
- Since participants will often be muted, having a plan will help you know when to mute and unmute.
- Give full attention, don’t multitask.
- When participants are not paying full attention, it can be a big distraction online just like an in-person group.
- When talking, spend some time looking at the camera, not just the screen.
- Stay in touch afterwards.
- Assign prayer partners to call each other after after group is over and pray with them.
- Or text each other in gender specific text chats to share requests.
- Leverage GroupMe, Facebook Groups, WhatsApp, group texting etc. as a place to stay connected and keep the conversation going throughout the week.
Format/Schedule
- Practice Session/First Meeting (30 minutes)
- It can be helpful to have a 30-minute practice session together, or take the first half of your first online LifeGroup to get everyone acquainted with how this will work.
- Review online etiquette/best practices (listed above). You may want to review some of these talking points the first several meetings until people figure it out.
- Help people learn how to use the technology and answer any questions.
- If you are a new group, make sure to introduce yourself, share your name, and share how you got connected with Church Unlimited and the online group. Just as you would in a physical LifeGroup.
- End by sharing prayer requests; have one group member pray.
- Typical Meeting (45-60 minutes)
- Connect - 15-20 minutes
- Welcome people as they login (people tend to arrive late online, just like in-person groups).
- Use an ice breaker.
- Discuss - 30-40 minutes
- Wrap Up - 5 minutes
- Ask for any prayer requests.
- Have one group member wrap up in prayer.
- Encourage people to text each other afterwards for further prayer requests and to pray together. (Prayer Ideas: men’s group text, women’s group text, whole group text, prayer partners.)
Additional Ways to Stay Connected
- Create a private Facebook group for your Lifegroup.
- Simply log into Facebook and click “Create” at the top of the page, then select “Group” from the drop down menu.
- Make sure to set the group to “Private” before you invite your members to join.
- Call each of your Group members weekly to check in with them, encourage them and let them know you’re praying for them. It’s easier than ever to feel disconnected in our world today, an encouraging phone call goes a long way to keep your group members feeling loved on and connected to you and the church.
- Enlist the group in finding ways to serve their neighbors. Maybe there’s an elderly person who could use some help with yardwork or grocery shopping. Or a single mom who could use some help around the house. Nothing draws a LifeGroup closer together than serving shoulder-to-shoulder to add value to someone else’s life.